Table of Contents
ToggleThat narrow strip of wall behind a bathroom vanity takes a beating, water splashes, toothpaste flecks, soap residue, and general daily wear. Left unprotected, drywall degrades, paint peels, and moisture finds its way into places it shouldn’t. A bathroom vanity backsplash solves all that while adding a design element that can elevate the entire space. Whether someone’s renovating a powder room or upgrading a master bath, installing a backsplash is a manageable DIY project that delivers outsized visual and functional returns. This guide walks through material choices, sizing decisions, installation steps, and design ideas to help anyone tackle this upgrade with confidence.
Key Takeaways
- A bathroom vanity backsplash protects drywall from water damage, mold, and staining while providing a design opportunity to elevate the entire space.
- Ceramic and porcelain tile are the gold standard for bathroom vanity backsplash installations, with subway tile, glass tile, and peel-and-stick options offering versatility for any budget or skill level.
- Backsplash height should range from 4 to 18 inches depending on your design goals, with 6 to 8 inches providing the practical middle ground for most bathrooms.
- Proper surface prep, thinset application, and 24-hour curing time before grouting are critical steps that ensure your bathroom vanity backsplash lasts and looks professional.
- Design cohesion comes from repeating one element—color, finish, or grout color—across your backsplash, countertop, and other bathroom fixtures.
- Caulking where the backsplash meets the countertop is essential, as it prevents cracking when materials expand and contract with temperature and humidity changes.
What Is a Bathroom Vanity Backsplash and Why You Need One
A bathroom vanity backsplash is a protective vertical surface installed on the wall directly behind a sink and countertop. Typically ranging from 4 to 18 inches in height, it shields drywall from water damage and staining while creating a visual transition between the vanity and the wall.
The functional reasons are straightforward. Water splashes during handwashing, toothbrushes drip, and cleaning products spray. Without a backsplash, moisture seeps into drywall, causing paint to bubble, drywall paper to delaminate, and eventually promoting mold growth. A properly sealed backsplash creates a waterproof barrier that wipes clean in seconds.
Beyond protection, a backsplash offers a design opportunity. It can introduce texture, color, or pattern to an otherwise plain bathroom. A well-chosen backsplash for bathroom vanity can tie together flooring, wall color, and fixtures, giving the space a finished, intentional look. In rental properties or budget renovations, it’s one of the highest-impact, lowest-cost upgrades available.
Some vanities come with an integrated backsplash molded into the countertop material, common with cultured marble or solid surface tops. These work fine but limit design flexibility. A separate tile backsplash behind bathroom vanity allows for customization and can be swapped out during future updates without replacing the entire countertop.
Popular Bathroom Vanity Backsplash Materials to Consider
Tile Options for Timeless Appeal
Ceramic and porcelain tile remain the gold standard for bathroom vanity tile backsplash installations. Both are waterproof, durable, and available in countless sizes, colors, and finishes. Ceramic tile is lighter and easier to cut with a basic tile cutter or wet saw, making it beginner-friendly. Porcelain tile is denser and more moisture-resistant, ideal for high-humidity bathrooms, but harder on blades and slightly more expensive.
Subway tile (3×6 inches) is a classic choice that works in traditional and modern bathrooms alike. Mosaic tile sheets, typically glass, ceramic, or porcelain chips mounted on a mesh backing, speed up installation and add visual interest. For a contemporary look, large-format tiles (12×24 inches or larger) minimize grout lines, though they require a flatter wall surface and more precise layout.
Glass tile brings reflective qualities that brighten small bathrooms. It requires a white thinset mortar (gray shows through) and careful grouting to avoid scratching the surface. Natural stone tiles like marble, travertine, or slate offer organic texture but need periodic sealing to resist water and staining. Stone is softer than porcelain, so it’s more prone to chipping during cutting, use a wet saw with a diamond blade and go slow.
Peel-and-stick tile has improved dramatically in recent years. Quality products now feature real ceramic or glass faces with adhesive backing, making them viable for renters or anyone intimidated by thinset and grout. They won’t last as long as traditionally installed tile, but for a powder room or secondary bath, they’re a legitimate option.
Natural Stone and Solid Surface Alternatives
Solid surface materials like Corian or quartz slabs can be fabricated into a backsplash that matches the countertop, creating a seamless look. This approach works well in modern or minimalist bathrooms where grout lines would feel busy. Fabrication typically requires a professional with specialized tools, and costs run higher than tile, but maintenance is nearly zero, just wipe and go.
Natural stone slabs, granite, marble, or quartzite, offer the same seamless aesthetic with unique veining. Like solid surface, they require professional cutting and installation. Marble is porous and stains easily without proper sealing: granite is more forgiving. Expect to reseal natural stone backsplashes annually in a high-use bathroom.
Beadboard paneling (tongue-and-groove boards with a decorative profile) works in cottage or farmhouse-style bathrooms. Use PVC beadboard rather than wood: it won’t rot or swell from moisture. Paint it with a semi-gloss or high-gloss finish for easy cleaning. Installation requires a miter saw for end cuts, a nail gun or construction adhesive, and caulk to seal edges.
For budget-conscious projects, acrylic or PVC backsplash panels sold at home centers offer a one-piece solution. They’re not stylish, but they’re waterproof, easy to install with adhesive, and cost under $30 for a standard vanity width. Use them in utility bathrooms or as temporary solutions.
How to Choose the Right Backsplash Height and Size
Backsplash height is a balancing act between function and aesthetics. The minimum effective height is 4 inches, which is standard for integrated backsplashes on pre-fab vanity tops. This protects the immediate splash zone but doesn’t offer much design impact.
A 6- to 8-inch backsplash is a practical middle ground for most bathrooms. It provides ample protection without overwhelming a small space or interfering with medicine cabinets and sconces. This height works well with standard subway tile laid horizontally (two courses plus a trim row) or a single row of larger-format tile.
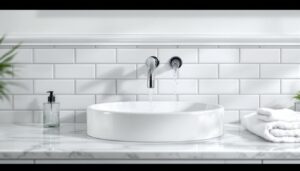
For a statement look, extend the backsplash 12 to 18 inches or even full-height to the ceiling. Full-height backsplashes work best behind wall-mounted or vessel sinks where the faucet is mounted on the wall rather than the countertop, this puts more plumbing penetrations through the backsplash, so waterproofing becomes critical. In powder rooms or spaces with bold tile choices featured in many contemporary bathroom designs, a full-height backsplash turns the vanity wall into a focal point.
Width typically matches the vanity width, extending a few inches beyond on each side or stopping flush with the edges. If the vanity sits between two walls, run the backsplash wall-to-wall for a built-in look. For a floating vanity or one with open space on the sides, end the backsplash a half-inch to an inch past the countertop edge to create a clean visual line.
Account for electrical outlets. If an outlet sits in the backsplash area, the tile or material must be cut to fit around the box. Extenders (box extension rings) may be needed to bring the outlet flush with the new tile surface, required by NEC Article 314.20. Electrical work beyond swapping a cover plate may require a licensed electrician depending on local code.
Step-by-Step: Installing Your Bathroom Vanity Backsplash
Materials and Tools Needed:
- Tile or chosen backsplash material
- Thinset mortar (unmodified for cement board, modified for drywall)
- Grout (sanded for joints wider than 1/8 inch, unsanded for narrower)
- Grout sealer
- Tile spacers
- Notched trowel (1/4×1/4-inch square notch for most wall tile)
- Tile cutter or wet saw
- Grout float
- Sponges and buckets
- Caulk (silicone or latex, color-matched to grout)
- Level, tape measure, pencil
- Safety glasses, dust mask, gloves
Step 1: Prep the Surface
The wall must be clean, dry, and flat. Remove any old caulk or debris along the countertop edge. If the wall is painted drywall in good condition, lightly sand it to improve thinset adhesion. For new drywall or areas prone to moisture, consider installing a sheet of 1/4-inch cement board as a backer. Fasten it with cement board screws every 8 inches and tape seams with fiberglass mesh tape and thinset.
Step 2: Plan the Layout
Dry-lay the tile on the countertop to visualize the pattern. Mark a level reference line on the wall at the desired backsplash height. For tile, aim to avoid thin slivers at the edges, adjust the layout so cuts are at least half a tile width. If using mosaic sheets, plan so seams land in inconspicuous spots.
Step 3: Apply Thinset and Set Tile
Mix thinset to a peanut butter consistency. Spread a thin layer on the wall with the flat side of the trowel, then comb through it with the notched edge at a 45-degree angle. This creates ridges that collapse when tile is pressed in, ensuring full contact.
Press the first tile into place with a slight twist. Insert spacers between tiles to maintain consistent grout joints (typically 1/16 inch for rectified tile, 1/8 inch for standard). Work in small sections, thinset skins over in 15 to 30 minutes. Check level frequently. For cuts, measure twice and use a wet saw for clean edges. Nippers or a tile file work for small notches around outlets.
Let thinset cure for 24 hours before grouting. Some fast-set thinsets allow grouting in 2 to 4 hours, check the bag.
Step 4: Grout the Joints
Mix grout and let it slake (rest) for 5 to 10 minutes, then remix. Hold the grout float at a 45-degree angle and press grout into joints, working diagonally across the tile. Remove excess by dragging the float across the surface at a steep angle.
After 10 to 20 minutes (when grout is firm but not hard), wipe the surface with a damp sponge in circular motions, rinsing frequently. Don’t oversaturate, this weakens grout. Let haze dry, then buff with a clean cloth.
Step 5: Seal and Caulk
After grout cures (typically 48 to 72 hours), apply a penetrating grout sealer following the manufacturer’s instructions. This prevents staining and moisture infiltration.
Finally, run a bead of caulk along the joint where the backsplash meets the countertop. Caulk is flexible and won’t crack like grout when materials expand and contract. Smooth with a wet finger or caulk tool. This detail separates amateur jobs from pro-looking installs.
Design Ideas and Style Inspiration for Every Bathroom
A simple, effective approach for bathroom vanity backsplash ideas is the monochromatic palette: match backsplash tile to the vanity countertop or wall color in a slightly different finish. White subway tile with white grout and a white quartz countertop creates a clean, spa-like feel without visual clutter. Vary the tile size or orientation, try vertical subway tile instead of the standard horizontal stack, for subtle interest.
For contrast, choose a backsplash that introduces the room’s accent color. If towels, rugs, or artwork feature navy, a dark blue mosaic backsplash ties everything together. Patterned cement tiles or encaustic-look porcelain can serve as the room’s focal point, especially in a powder room where bold choices won’t feel overwhelming.
Skinny backsplashes (4 to 6 inches) with striking materials punch above their weight. A narrow band of metallic glass tile, honed marble, or patterned ceramic draws the eye without dominating the space, an approach highlighted in minimalist bathroom trends that emphasize restraint and impact.
Texture adds depth in small bathrooms. 3D tile with raised geometric patterns, stacked stone ledger panels, or textured porcelain that mimics fabric or wood grain all create shadow lines that shift with lighting throughout the day. Pair textured backsplashes with simple countertops and fixtures so the wall remains the star.
In shared or kids’ bathrooms, prioritize durability and ease of cleaning. Large-format porcelain with minimal grout lines and a matte or semi-gloss finish resists water spots and wipes clean quickly. Avoid natural stone or grout-heavy mosaics in high-traffic baths, they require more maintenance.
For those seeking fresh perspectives on material combinations and color schemes, browsing curated design galleries can spark ideas that align with personal style while respecting the practical demands of a wet environment.
A backsplash doesn’t have to match the shower or floor tile, but repeating one element, color, finish, or grout color, creates visual cohesion. In an open-plan bathroom, extending the vanity backsplash material onto an adjacent accent wall unifies the space without a full re-tile.