Table of Contents
ToggleInstalling a dishwasher shouldn’t require an engineering degree or a custom-built kitchen. Yet for many homeowners working with accessibility needs or specific design constraints, standard appliances can create frustrating barriers. ADA dishwashers solve this problem without compromising performance or forcing you into expensive remodels. These shorter-profile units fit seamlessly under raised counters and offer the same cleaning power as their taller counterparts. Whether you’re renovating for aging-in-place, building an accessible kitchen, or simply working with unique counter heights, understanding ADA-compliant dishwashers helps you make smarter appliance decisions.
Key Takeaways
- ADA dishwashers stand 32 to 34 inches tall—3 inches shorter than standard models—and provide wheelchair accessibility while accommodating custom counter heights without expensive kitchen remodels.
- These ADA-compliant units offer the same cleaning power, rack capacity (8-14 place settings), and Energy Star ratings as standard dishwashers, making them equally efficient for everyday use.
- ADA dishwashers benefit anyone with mobility challenges, not just wheelchair users, including people recovering from surgery, managing chronic pain, or aging in place.
- When choosing an ADA dishwasher, prioritize measuring your counter height and cabinet opening (typically 24 inches wide), checking decibel ratings (44 dB or lower for open kitchens), and selecting models with front-mounted, tactile controls for accessibility.
- Proper installation requires a dedicated 15-amp circuit with GFCI protection, secure mounting brackets under the counter, and careful leveling to prevent drainage issues—tasks that straightforward replacements handle but new installations may require professional help.
- ADA-accessible kitchens appeal to broader buyer pools and boost resale value in aging-population markets while solving practical design challenges like accommodating thick countertops in historic homes.
What Is an ADA Dishwasher and Why Does It Matter?
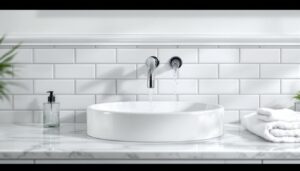
An ADA dishwasher stands 32 to 34 inches tall, compared to the standard 35-inch height found in most kitchens. This shorter profile meets Americans with Disabilities Act design guidelines, which require knee clearance beneath countertops for wheelchair users.
The critical difference lies in installation flexibility. Standard dishwashers require counters at roughly 36 inches to accommodate the appliance plus leveling legs. ADA-height dishwashers work with raised counter installations, typically 34 inches, leaving open space beneath for wheelchair access. This isn’t just about compliance: it’s about creating kitchens that function for people of all mobility levels.
These units aren’t special-order medical equipment. Major appliance manufacturers including Bosch, Whirlpool, and GE produce ADA models with the same Energy Star ratings, rack configurations, and wash cycles as full-height versions. The shorter tub doesn’t mean fewer place settings: most ADA compliant dishwashers still hold 8 to 14 place settings depending on brand and model.
For homeowners without accessibility needs, ADA dishwashers solve other problems: fitting under custom-height counters in historic homes, accommodating unusually thick countertops (like reclaimed wood or thick concrete), or matching non-standard cabinetry measurements without ordering expensive custom panels.
Key Features That Define ADA-Compliant Dishwashers
Height specifications form the core requirement. ADA dishwashers measure 32 to 34 inches tall (without adjustable legs fully extended). This maintains the 27-inch minimum knee clearance required under ADA standards when installed beneath a 34-inch counter. Always verify actual dimensions in the spec sheet, some manufacturers list height ranges with leveling legs adjusted.
Control placement matters for accessibility. Front-mounted controls at waist height work better for seated users than top-edge buttons on standard models. Look for dishwashers with clearly labeled, tactile controls rather than flat touch-sensitive panels that provide no feedback. Some models include Braille indicators or audible cycle completion alerts.
Door clearance affects usability in tight spaces. The swing radius on an ADA dishwasher door operates identically to standard models, but the lower installation height changes the ergonomics. Users can load and unload racks without reaching overhead, which reduces strain for anyone with shoulder or back limitations.
Rack configuration stays largely consistent with standard models. Manufacturers use the same adjustable tine layouts and fold-down sections. The shorter tub height slightly reduces capacity in the top rack for oversized items like tall wine glasses, but functional capacity for everyday dishes remains comparable. Most ADA height dishwashers accommodate 10-inch dinner plates without issue.
Energy and water efficiency match standard models. The tub size difference doesn’t significantly impact resource consumption. Look for the same Energy Star certification and estimated annual operating costs you’d check on any dishwasher, typically 270 kWh per year and 3.5 gallons per cycle for efficient models.
Benefits of Installing an ADA Dishwasher in Your Home
Accessibility benefits extend beyond wheelchair users. Anyone recovering from surgery, dealing with chronic pain, or experiencing reduced mobility as they age finds lower dishwashers easier to load without excessive bending or reaching. This makes ADA models practical for aging-in-place renovations, a growing consideration as homeowners plan for long-term functionality.
Kitchen designs focused on universal accessibility incorporate lower counter sections that ADA dishwashers complement naturally. The reduced height allows cooks to work seated at the counter while keeping the dishwasher within comfortable reach.
Resale value gets a boost in markets with aging populations or accessibility awareness. Homes with accessible features appeal to broader buyer pools. While you won’t recoup installation costs dollar-for-dollar, accessible kitchens differentiate properties in competitive markets.
Design flexibility solves non-accessibility challenges. Thick butcher-block counters (2.5 to 3 inches) or concrete pours (1.5 to 2 inches) can push standard dishwashers out of spec. An ADA model absorbs those extra inches without custom cabinet modifications. Historic homes with lower cabinets or non-standard layouts benefit from the dimensional flexibility.
Easier loading for everyone. The lower height means less bending for all users, not just those with mobility limitations. Parents loading dishes while holding toddlers, or anyone with a sore back after yard work, appreciate the ergonomic advantage. Independent testing by cleaning appliance experts confirms that ADA-compliant models perform comparably to standard heights across all cleaning metrics.
How to Choose the Right ADA Dishwasher for Your Kitchen
Measuring Your Space and Counter Height
Start by measuring the existing counter height from floor to underside of the counter. Standard counters sit at 36 inches: accessible counters measure 34 inches or slightly lower. ADA dishwashers require 32 to 34 inches of vertical space, plus clearance for water lines and electrical connections.
Measure the cabinet opening width. Standard dishwasher cutouts run 24 inches wide. Verify this dimension even in accessible kitchens, cabinet manufacturers occasionally vary widths by a quarter-inch, which creates installation headaches. If your opening measures 23.5 to 24.25 inches, you’re within tolerance. Outside that range, you’ll need cabinet modifications.
Check depth from cabinet face to back wall. Most dishwashers need 24 to 25 inches of depth. Factor in space for hoses and cords behind the unit, add 2 inches minimum. If you’re working with shallower cabinets (common in vintage homes), confirm the appliance depth won’t protrude past cabinet fronts.
Document flooring type and condition. Dishwashers sit on leveling legs that adjust ±1 inch. Uneven tile or thick vinyl can affect final installed height. If your floor slopes more than 1/4 inch across the installation area, plan for shimming during install.
Comparing Performance and Capacity Options
Decibel ratings matter more than most specs. Quiet dishwashers measure 44 dB or lower: anything above 50 dB intrudes on kitchen conversations. If your kitchen opens to living spaces, prioritize models in the 38 to 44 dB range. Insulation packages add cost but deliver noticeable noise reduction.
Wash cycle variety affects daily use. Basic ADA models offer normal, heavy, and quick cycles. Mid-range units add sanitize cycles (reaching 150°F to kill bacteria) and half-load options. Assess whether you need specialty cycles like china/crystal or steam prewash, they’re convenient but not essential for most households.
Rack adjustability varies by model. Better units feature height-adjustable top racks (useful when you alternate between tall pots and stacked bowls) and fold-down tines that accommodate large platters. Cheaper models use fixed racks that limit loading flexibility. Current models reviewed on compact ADA dishwasher roundups highlight adjustable racks as a key differentiator.
Drying systems split between heated dry and condensation dry. Heated dry uses an element to evaporate water (faster but uses more energy). Condensation systems rely on residual heat and stainless tubs (slower but more efficient). Both work fine: choose based on whether you need dishes ready immediately or can wait.
Finish and panel options affect kitchen aesthetics. Stainless steel exteriors match most appliances but show fingerprints. Panel-ready models accept custom cabinet panels for integrated looks. Black stainless and slate finishes offer smudge resistance at a premium. Factor in whether you want the dishwasher visible or hidden, this influences panel choices and budget.
Installation Considerations for ADA Dishwashers
Electrical requirements follow NEC Article 422.16: dishwashers need a dedicated 15-amp circuit (20-amp preferred) with GFCI protection. If you’re replacing an existing dishwasher, the circuit likely exists. New installations require running 14/2 or 12/2 NM cable from the panel. This is straightforward if the panel sits nearby: otherwise, hire a licensed electrician. Permits are required for new circuits in most jurisdictions.
Plumbing connections require a hot water supply line (typically 3/8-inch compression fitting) and a drain line. Supply lines should include a shutoff valve beneath the sink for maintenance access. Drain lines connect to the sink tailpiece or garbage disposal with an air gap to prevent backflow, required by plumbing code in most areas. If your existing dishwasher uses an old gate-valve shutoff, replace it with a quarter-turn ball valve during installation.
Securing the unit involves mounting brackets that attach to underside of counters. ADA dishwashers use the same bracket systems as standard models, but the lower installation height changes the angle. Follow manufacturer instructions for bracket placement, typically 1 inch below counter level, screwed into solid wood or blocking. Never rely on side-mounting screws alone: they don’t prevent forward tipping when the door opens.
Leveling the appliance prevents drainage issues and door alignment problems. Use the adjustable legs to achieve level side-to-side and front-to-back. A 2-foot level works for this task: check multiple points across the top. Slight forward tilt (1/8 inch over 24 inches) helps drainage but isn’t mandatory on modern units with robust pumps.
Safety warnings for DIY installers: shut off power at the breaker and water at the shutoff before disconnecting old units. Wear gloves when handling the old appliance, sharp sheet metal edges and rusty screws create cut hazards. If you encounter supply lines with corrosion or galvanized steel pipes, call a plumber, these indicate aging plumbing that may fail when disturbed.
Most homeowners with basic tool skills can swap dishwashers (adjustable wrench, screwdriver, torpedo level, and channellock pliers cover the job). First-time installations involving new circuits or drain lines cross into permit territory and benefit from professional help. Know your limits, calling in a pro for rough-in work while handling finish installation yourself splits costs sensibly.